
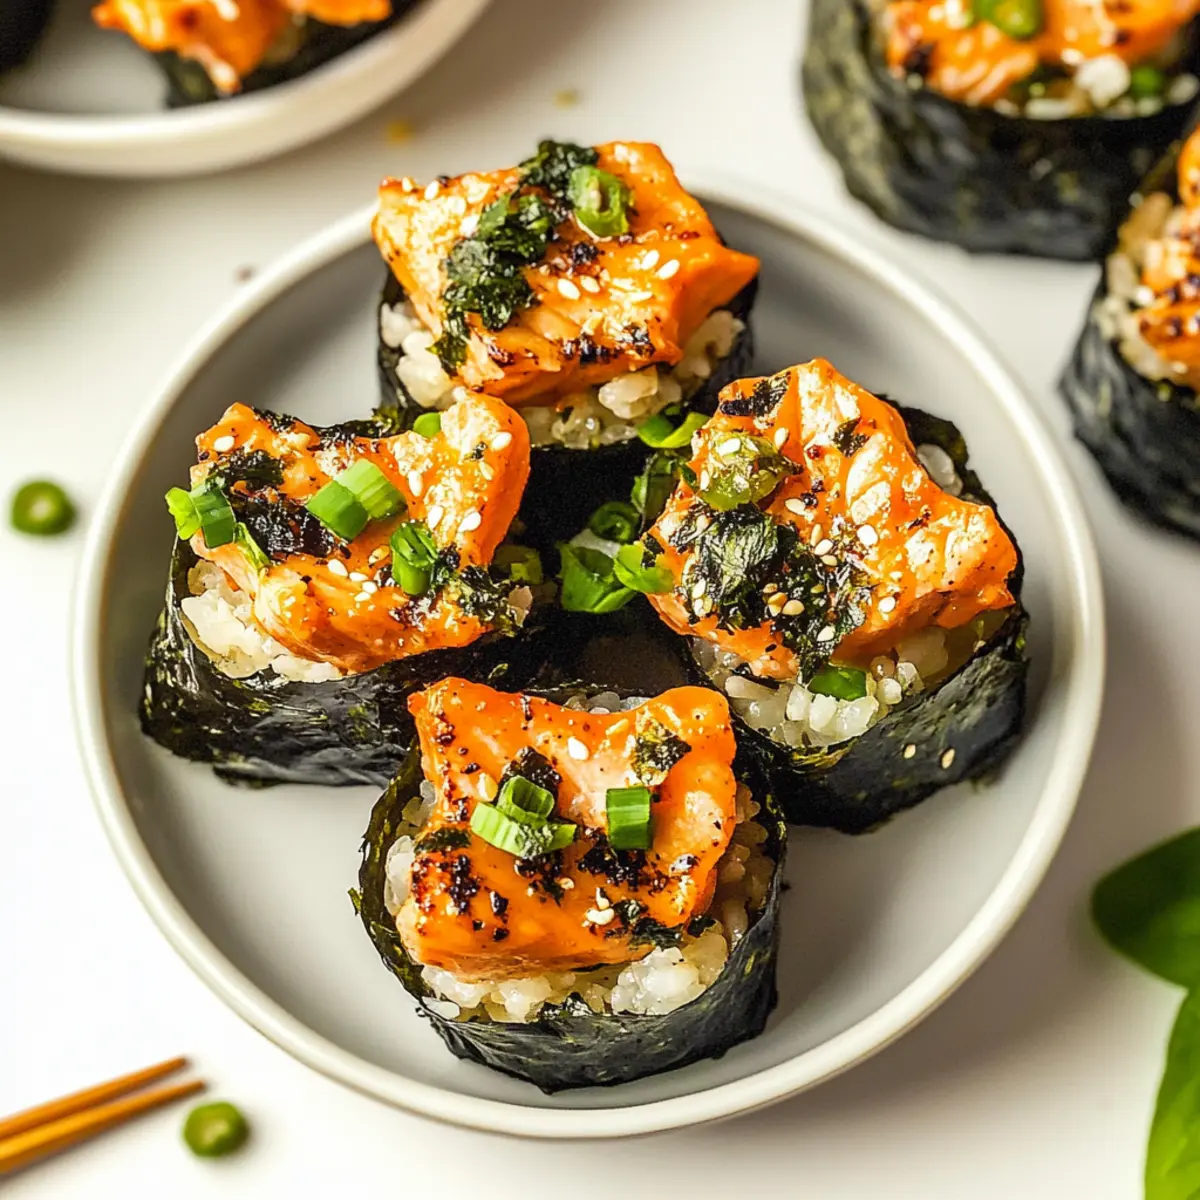
As I stood in my kitchen, I couldn’t help but smile at the delicious chaos of cooking—a sprinkle of this, a dash of that. Enter my latest glorious creation: Easy Baked Salmon Sushi Cups. This fun, deconstructed sushi version is not only a breeze to prepare, but it also makes for an unforgettable appetizer that’ll impress your friends and family every single time. With their warm, savory filling of tender salmon and fluffy sushi rice nestled in crispy nori cups, these delightful bites combine comfort and flavor in a way that traditional sushi can’t achieve. Plus, they’re perfect for gatherings or a cozy night in. Why not elevate your next meal with a taste of this viral sensation? Are you ready to dive into this culinary adventure?

Why Try These Sushi Cups?
Viral Sensation: These Easy Baked Salmon Sushi Cups are taking the culinary world by storm!
Deconstructed Delight: Enjoy the fun of sushi in a simple cup format without the need for rolling.
Quick & Easy: Perfect for busy weeknights or spontaneous gatherings—ready in just 30 minutes!
Crowd-Pleasing: Whether for a party or family meal, these sushi cups are sure to impress and satisfy everyone’s taste buds.
Flavorful Fusion: Experience the comforting blend of warm salmon and sticky rice, all wrapped in crispy nori. Dive deeper into this recipe and pair it with sides like Cucumber Salad for the ultimate sushi experience!
Baked Salmon Sushi Cups Ingredients
• Here’s everything you need to create these delicious Baked Salmon Sushi Cups!
For the Salmon Mixture
- Salmon – Freshly cubed salmon provides a rich and savory flavor; opt for sushi-grade salmon for the best taste.
- Light Soy Sauce – Adds umami and enhances the salmon’s taste; tamari is a great gluten-free substitute.
- Kewpie Mayo – This creamy mayo gives a slight sweetness; you can use regular mayonnaise, although it alters the flavor.
- Sriracha – Offers a delightful spicy kick; adjust to your heat preference for a customized bite.
- Sesame Oil – Adds depth and a nutty aroma; can be substituted but may lose some characteristic flavors.
For the Rice Base
- Sushi Rice – Short-grain rice is preferred, providing the ideal sticky texture for these cups.
- Rice Vinegar – Enhances the flavor of sushi rice; apple cider vinegar can work in a pinch.
- White Sugar – Balances the acidity to make the rice tasty; honey or agave syrup can be alternatives if needed.
For the Nori Cups
- Nori Sheets – Essential for creating the sushi cup structure; they contribute to the overall sushi flavor.
- Cooking Spray – Prevents the sushi cups from sticking to the muffin tin.
For Garnishing
- Furikake – A flavorful Japanese seasoning that adds extra taste; it’s optional but highly recommended.
- Green Onion – Freshness adds a nice touch; feel free to use chives as a vibrant alternative.
With these ingredients, you are all set to make the sensational Baked Salmon Sushi Cups that will not only impress the taste buds but also spark joy in your kitchen!
Step‑by‑Step Instructions for Baked Salmon Sushi Cups
Step 1: Cook the Sushi Rice
Start by cooking the sushi rice according to the package instructions. Typically, you’ll want to rinse 1 cup of rice until the water runs clear, then cook it with 1 ¼ cups of water in a rice cooker or on the stovetop. Once cooked, let it sit for about 10 minutes, then gently mix in a combination of rice vinegar and sugar for that perfect sushi flavor.
Step 2: Preheat the Oven
While the rice is cooling, preheat your oven to 400°F (200°C). This will ensure that your Baked Salmon Sushi Cups cook evenly and develop that delightful golden color on top. A preheated oven is key to getting everything just right!
Step 3: Prepare the Salmon Mixture
In a mixing bowl, combine the freshly cubed salmon with light soy sauce, Kewpie mayo, sriracha, and sesame oil. Mix well until every piece of salmon is coated with this flavorful blend. This creamy mixture will bring richness to your sushi cups, and you can set it aside while you prepare the nori.
Step 4: Cut and Prepare Nori Sheets
Carefully cut your nori sheets into squares that will fit snugly into the muffin tin. Lightly grease each muffin cup with cooking spray to prevent sticking. The nori will form a cup shape to hold the delicious filling of your Baked Salmon Sushi Cups.
Step 5: Assemble the Sushi Cups
Take a spoonful of your prepared sushi rice and gently place it into each nori cup. Use the back of a spoon to press the rice down lightly, creating a firm base. Next, layer the salmon mixture on top of the rice, filling each cup almost to the brim. This layering is crucial for ensuring each bite bursts with flavor!
Step 6: Bake the Cups
Carefully place the muffin tin into the preheated oven and bake for 15 minutes. Keep an eye on them—you’re looking for the salmon to be cooked through and the tops slightly golden. This will give your Baked Salmon Sushi Cups a lovely texture that contrasts perfectly with the soft rice.
Step 7: Garnish and Serve
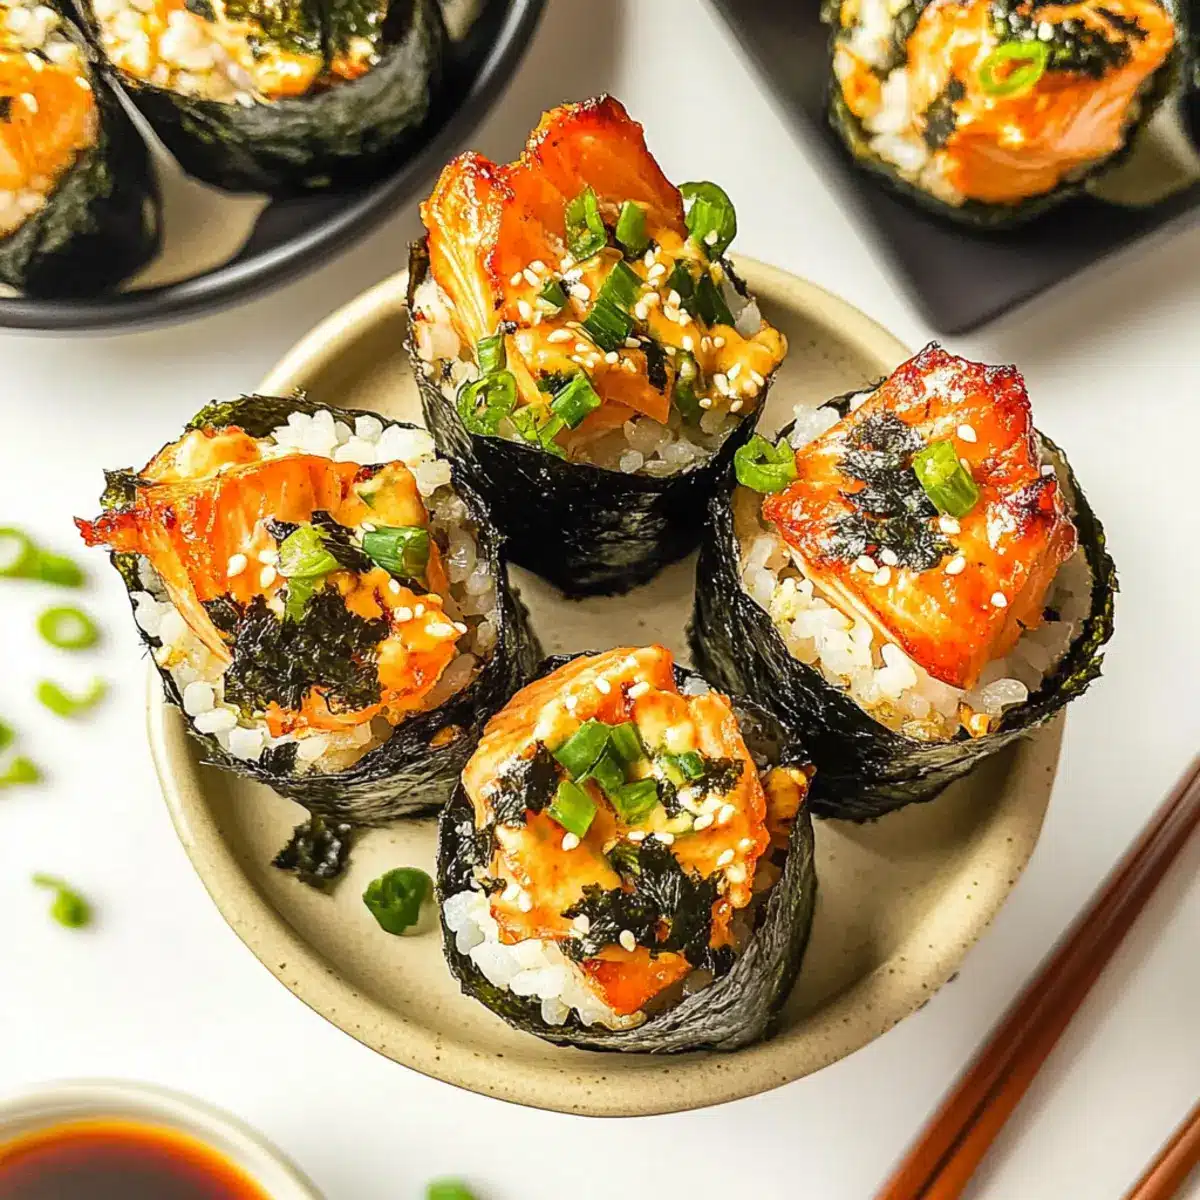
After removing the cups from the oven, drizzle any remaining sriracha or spicy mayo over the top for added flavor. Finish with a sprinkle of furikake and some chopped green onions for a fresh touch. Serve your warm Baked Salmon Sushi Cups immediately for an unforgettable appetizer that’s sure to impress!

What to Serve with Easy Baked Salmon Sushi Cups?
Imagine a beautifully arranged table filled with vibrant flavors and textures, perfectly complementing your delicious sushi cups.
- Cucumber Salad: This refreshing dish adds a crisp crunch that balances the warm, savory sushi cups.
- Egg Drop Soup: A light and comforting choice that harmonizes the meal with its warm broth and delicate texture.
- Pickled Ginger: A traditional sushi accompaniment, its tangy kick acts as a palate cleanser between bites.
- Wasabi Peas: Their spicy, crunchy texture enhances the overall flavor experience and provides a delightful contrast.
- Sesame Edamame: Nutty and buttery, these tender beans bring a vibrant green element to your meal.
- Sparkling Water with Lime: Keep it light and refreshing with a zesty drink that cuts through the richness of the salmon.
- Mochi Ice Cream for Dessert: End your meal on a sweet note with this chewy, creamy treat, perfect for a fun dessert experience.
Elevate your dining experience by considering these delightful pairings that make your Easy Baked Salmon Sushi Cups shine even brighter!
Expert Tips for Baked Salmon Sushi Cups
-
Stickiness Matters: Ensure your rice achieves the right sticky consistency by rinsing it until the water runs clear and adjusting the water during cooking. This is crucial for your Baked Salmon Sushi Cups holding together.
-
Watch the Clock: Overbaking can dry out the salmon, so keep a close eye on the oven; 15 minutes is typically perfect for achieving that golden-brown top without compromising moisture.
-
Experiment Freely: Don’t hesitate to add your favorite toppings or toppings. Mixing in veggies like avocado or adjusting the spice level with different sauces can personalize your Baked Salmon Sushi Cups.
-
Sushi-Grade Salmon: Always opt for sushi-grade salmon to ensure safety and flavor; using lower quality fish might not provide the best eating experience you deserve.
-
Nori Handling: For a crispy texture, lightly toast the nori sheets before assembly. This step can enhance the overall flavor and prevent them from becoming too chewy after baking.
Make Ahead Options
These Easy Baked Salmon Sushi Cups are perfect for meal prep enthusiasts! You can prepare the sushi rice and salmon mixture up to 24 hours in advance, storing them separately in airtight containers to maintain freshness. Simply refrigerate the cooked sushi rice and the mixed salmon until you’re ready to assemble. When it’s time to serve, cut the nori sheets and prepare the muffin tin, then layer the rice and salmon mixture into each cup. Bake in the preheated oven for 15 minutes, and you’ll have delightful Baked Salmon Sushi Cups that taste just as good as when freshly made. Enjoy the time-saving benefits while still impressing your family and friends!
Baked Salmon Sushi Cups Variations
Feel free to get creative with these Easy Baked Salmon Sushi Cups and make them your own!
- Shrimp Swap: Substitute salmon with cooked shrimp for a delightful seafood twist that’s equally delicious.
- Crab Delight: Try using crab meat instead for a luxurious and sweet flavor profile that elevates your cups.
- Tofu Alternative: For a vegetarian option, swap in firm tofu marinated in soy sauce to absorb a savory taste.
- Veggie Boost: Mix in diced cucumbers or avocados with the salmon for a fresh crunch and creamy texture.
- Spice It Up: Adjust the heat by adding diced jalapeños into the salmon mixture for a kick that’s not overwhelming.
- Sweet and Spicy: Combine sriracha with a bit of honey for a sweet and spicy sauce that glazes the top beautifully.
- Sesame Garnish: Top with toasted sesame seeds to enhance the nutty flavor and add an appealing crunch.
- Nori Variations: Experiment with flavored nori sheets, like wasabi or sesame, to introduce new and exciting tastes.
If you love the idea of customizing recipes, check out these incredible options like Baked Salmon Tacos or for something different, try the Bang Bang Salmon for another mouthwatering twist!
How to Store and Freeze Baked Salmon Sushi Cups
Fridge: Store leftover Baked Salmon Sushi Cups in an airtight container for up to 3 days. Ensure they are completely cooled before sealing to maintain freshness.
Freezer: For longer storage, freeze the sushi cups individually wrapped in plastic wrap, then place them in a freezer-safe bag. They will keep well for up to 2 months.
Reheating: To enjoy your sushi cups again, reheat them in the oven at 350°F (175°C) for about 10 minutes until heated through, or microwave them for 1-2 minutes on high, checking to avoid overcooking.
Serving Fresh: For the best taste, serve the Baked Salmon Sushi Cups fresh out of the oven, but they can be saved and enjoyed later as well!
Easy Baked Salmon Sushi Cups Recipe FAQs
What type of salmon should I use?
Absolutely! For the best flavor and safety, I recommend using sushi-grade salmon. This type of salmon is fresh and safe for raw consumption, ensuring your Baked Salmon Sushi Cups taste delightful. If sushi-grade isn’t available, opt for salmon that looks bright and moist without any dark spots or a fishy smell.
How should I store leftovers?
Very important! Store your leftover Baked Salmon Sushi Cups in an airtight container in the refrigerator for up to 3 days. Make sure they are completely cooled before sealing the container to maintain optimal freshness and prevent sogginess.
Can I freeze these sushi cups?
Definitely! For freezing, wrap each sushi cup individually in plastic wrap and then place them in a freezer-safe bag. They can be stored for up to 2 months. When you’re ready to enjoy them, simply thaw overnight in the refrigerator and reheat in the oven at 350°F (175°C) for about 10 minutes for best results.
What should I do if my sushi rice isn’t sticky enough?
No worries! If your sushi rice isn’t sticky enough, you can mix in a little additional rice vinegar or an extra teaspoon of sugar after cooking. It also helps to ensure you rinse the rice thoroughly until the water runs clear, as this removes excess starch crucial for that perfect sticky texture.
Can I make these sushi cups without nori?
Absolutely! If you prefer to skip the nori or have a seaweed allergy, feel free to substitute the nori cups with mini wonton wrappers or phyllo pastry. Bake them according to their package directions before filling them with the rice and salmon mixture for a fun twist!
Are there any dietary considerations I should know?
Yes! If you’re cooking for someone with allergies, please note that this recipe contains fish, soy (in soy sauce), and potentially gluten if not using tamari. Always check labels, and you can easily substitute ingredients to accommodate dietary needs, such as using gluten-free mayonnaise or omitting spicy elements for those sensitive to heat.
Easy Baked Salmon Sushi Cups for Quick Sushi Cravings
Ingredients
Equipment
Method
- Cook the sushi rice by rinsing 1 cup until the water runs clear, then cook with 1 ¼ cups water. Let sit for 10 minutes, then mix in rice vinegar and sugar.
- Preheat the oven to 400°F (200°C).
- In a mixing bowl, combine salmon with soy sauce, Kewpie mayo, sriracha, and sesame oil. Mix until coated.
- Cut nori sheets into squares that fit muffin tin. Grease each cup with cooking spray.
- Spoon sushi rice into each nori cup, pressing down lightly. Layer with salmon mixture.
- Bake for 15 minutes until salmon is cooked through and tops are golden.
- Garnish with remaining sriracha, furikake, and green onions. Serve warm.
Leave a Reply