
As I stood in my kitchen, the scent of toasted pecans filled the air, instantly transporting me to cozy holiday gatherings with friends and family. This Classic Easy Cheese Ball is a nostalgic staple that effortlessly combines creamy cream cheese with sharp cheddar, fresh green onions, and a dash of Worcestershire sauce. Perfect for any occasion, this appetizer is not just a crowd-pleaser but also a low-carb option, making it a thoughtful choice for gatherings without compromising on flavor. With minimal prep, you can whip it up ahead of time, ensuring you have more moments to enjoy with loved ones. Curious how to elevate this classic treat even further? Let’s dive into the recipe!
Why is This Cheese Ball a Must-Try?
Crowd-Pleasing: This Easy Cheese Ball is sure to impress your guests, offering a delightful balance of creamy and crunchy textures.
Versatile Flavors: With options to mix different cheeses or spices, you can easily customize it to fit any palate.
Quick Prep: Just a few simple steps and minimal ingredients mean less time in the kitchen and more time enjoying your gathering.
Make-Ahead-Friendly: Prep it a week in advance to ease hosting stress.
Perfect for Any Occasion: Whether it’s a game day, holiday, or casual get-together, this appetizer shines bright on any table.
For more elevated appetizer ideas, check out my Buffalo Chicken Cheese or delectable Mini Grilled Cheese recipes!
Easy Cheese Ball Ingredients
For the Cheese Ball
- Cream Cheese – A smooth base that brings creaminess; ensure it’s softened for easy mixing.
- Cheddar Cheese – Adds a sharp, tangy flavor; feel free to substitute with a milder cheese if preferred.
- Green Onion – Offers a fresh pop of flavor; chives can be used as a substitute for a similar effect.
- Worcestershire Sauce – Infuses a savory depth from umami; omit for a milder cheese ball.
- Lemon Juice – Brightens the overall taste; vinegar can be a suitable alternative for a gentler flavor.
- Salt – Enhances all the flavors; adjust based on the saltiness of your cheeses.
- Pecans – Provides a delightful crunch on the exterior; walnuts or other nuts can be swapped in based on your taste.
For Serving
- Crackers – Choose a variety for guests to pair with the cheese ball; they’re perfect for spreading!
- Fresh Vegetables – Serve with carrot sticks, cucumber slices, or celery for a refreshing balance.
This classic Easy Cheese Ball is not just an appetizer; it’s the heart of your gathering, showcasing flavors that evoke warm memories and inviting laughter. Enjoy it!
Step‑by‑Step Instructions for Easy Cheese Ball
Step 1: Combine Ingredients
In a stand mixer, blend 8 ounces of softened cream cheese, 2 cups of shredded sharp cheddar, and ¼ cup of finely chopped green onions. Add 1 teaspoon of Worcestershire sauce, 1 teaspoon of lemon juice, and a pinch of salt. Mix on medium speed for 3-4 minutes until the mixture is smooth and creamy. You’ll know it’s ready when there are no lumps and it has a lovely, even consistency.
Step 2: Form Cheese Ball
Once mixed, use your hands to scrape the cheese mixture from the bowl and form it into a ball shape. This should take about 2-3 minutes; aim for a compact ball that holds together well. If the mixture is sticky, lightly moisten your hands to help mold it more easily. The Easy Cheese Ball is now ready for its crunchy outer layer.
Step 3: Coat with Pecans
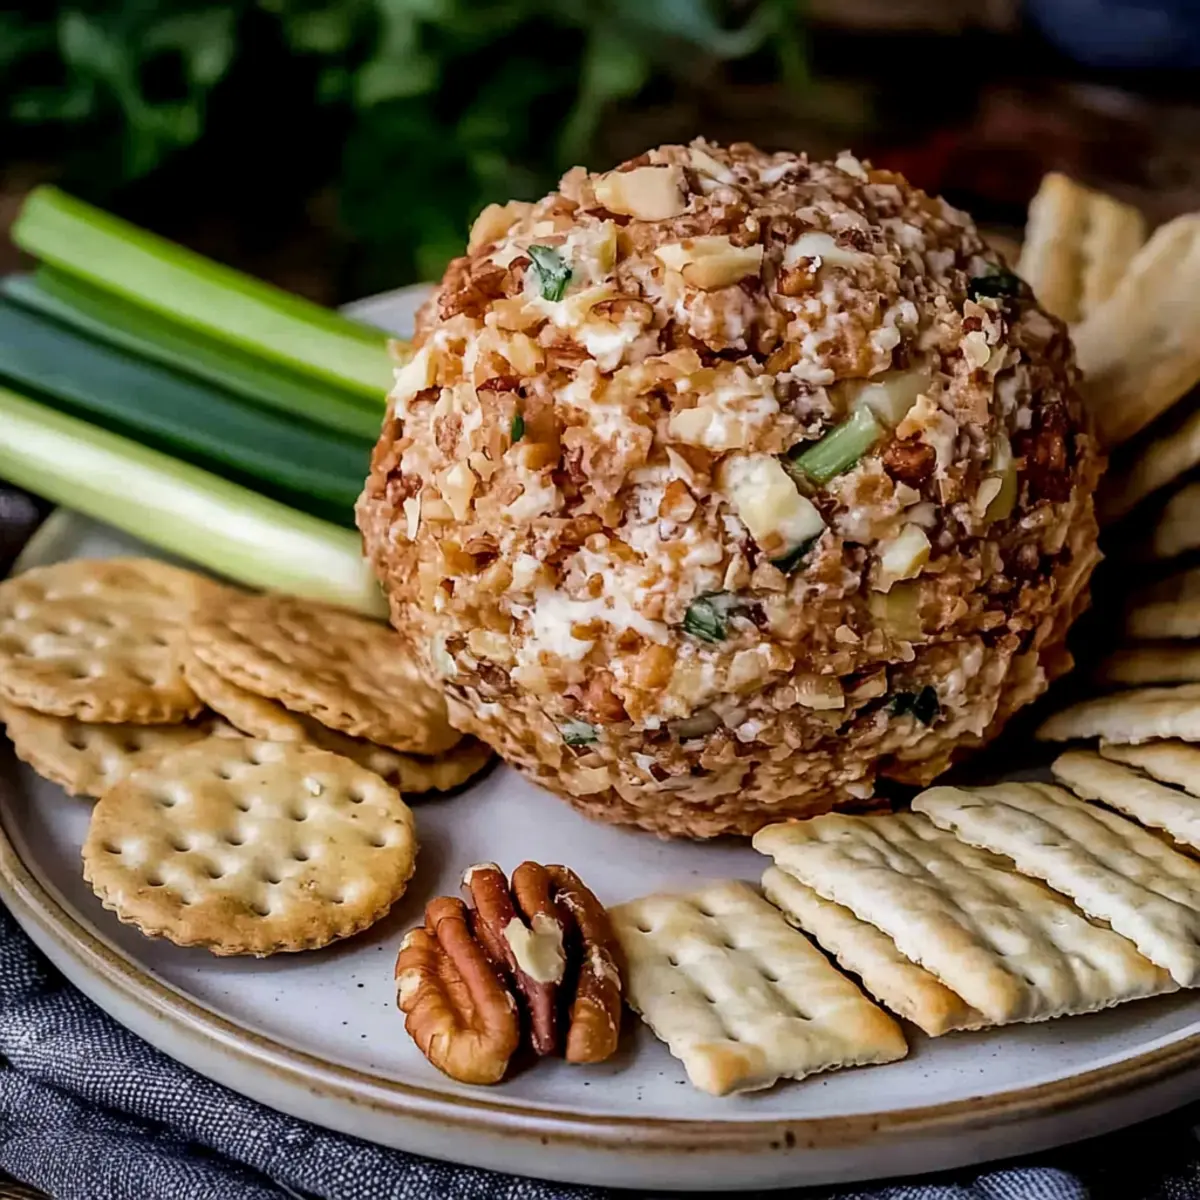
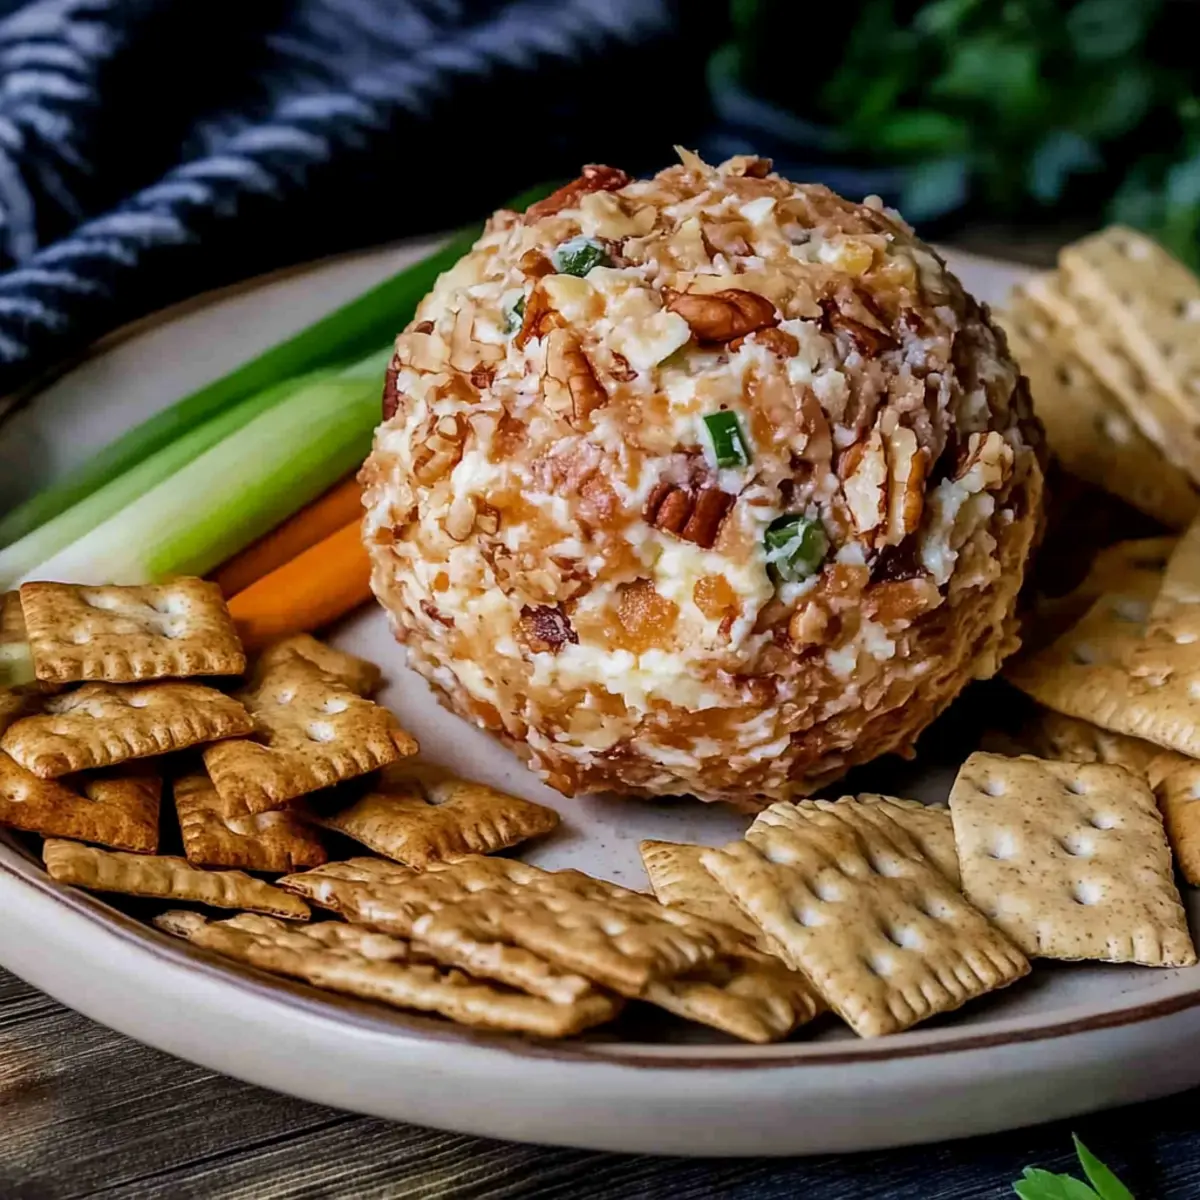
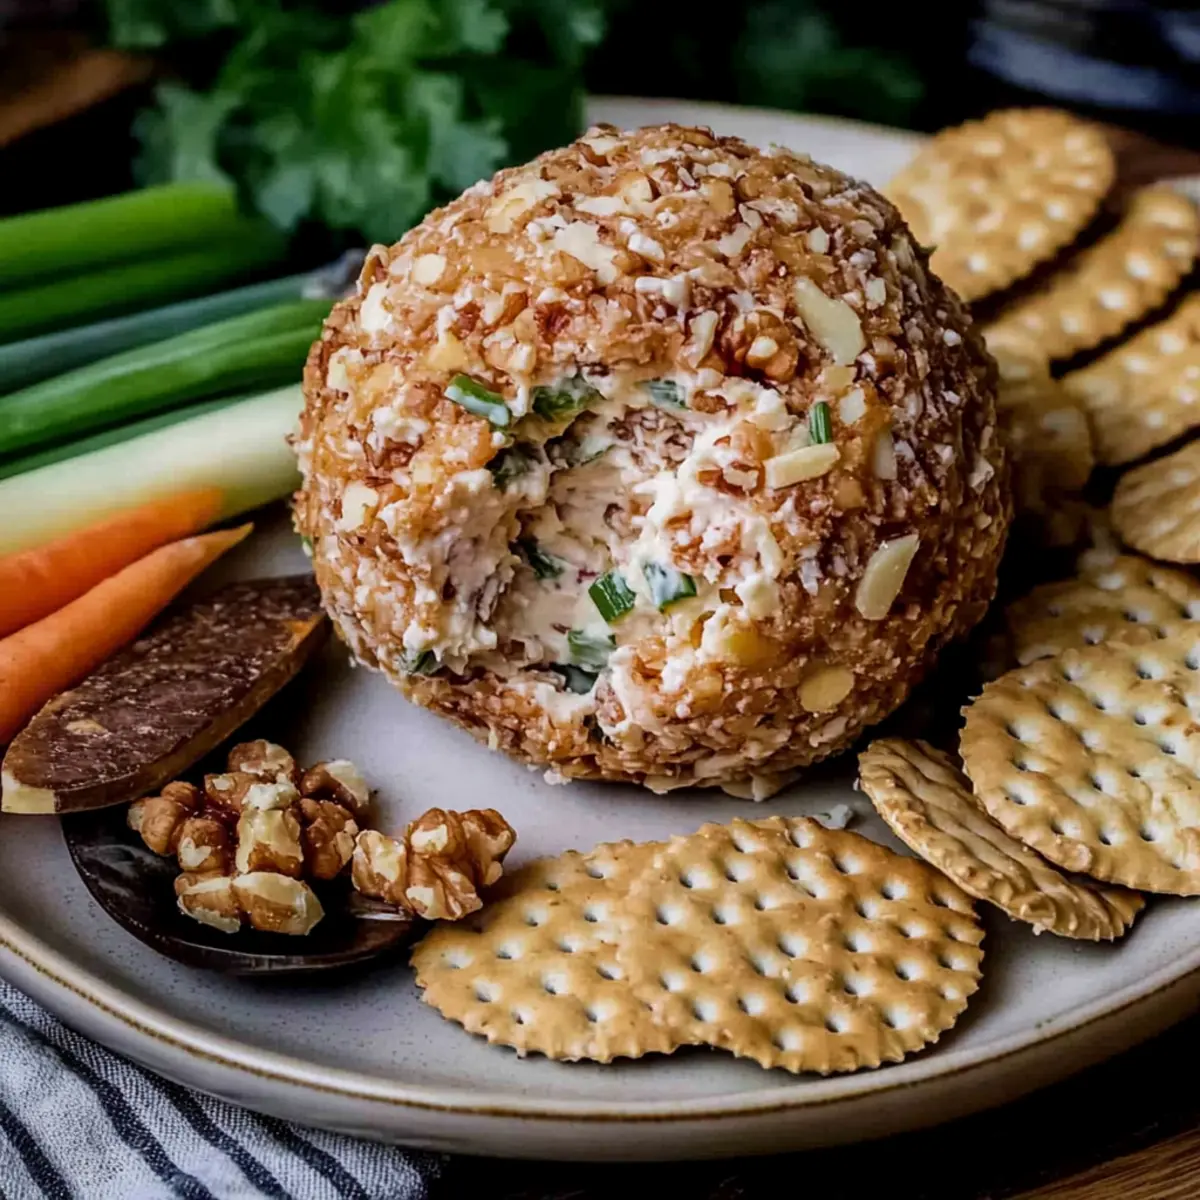
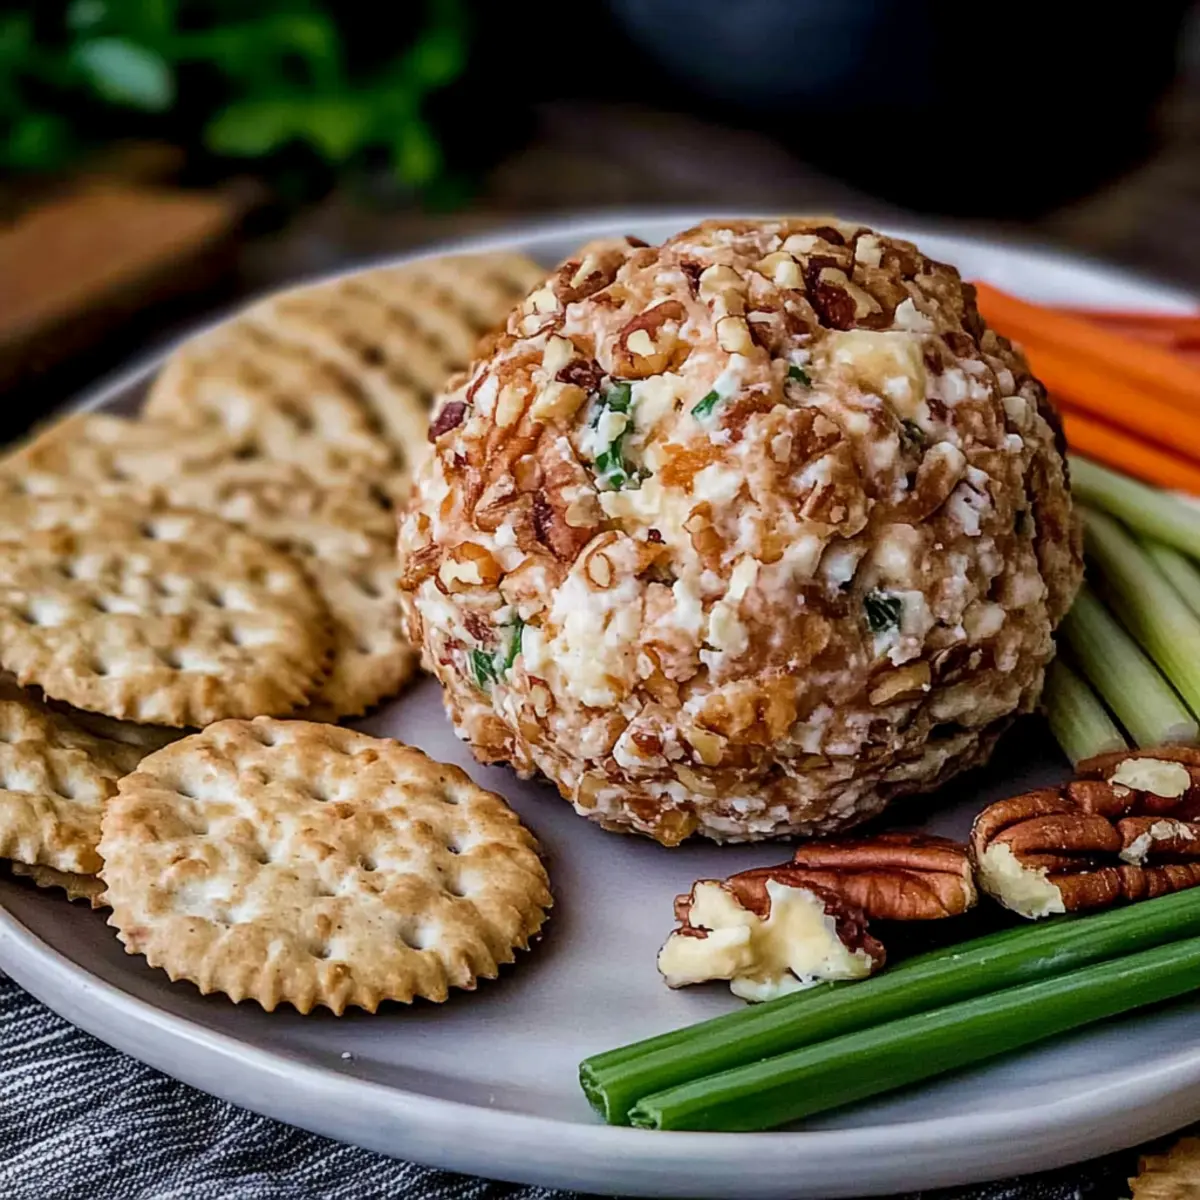
Prepare a plate with 1 cup of finely chopped pecans. Carefully roll the formed cheese ball in the pecans, ensuring it gets completely coated on all sides. This step should take around 2-3 minutes, so be sure to press gently to ensure the nuts adhere to the cheesy surface, creating a delicious crunch that enhances every bite.
Step 4: Chill
Wrap the coated cheese ball tightly in plastic wrap and refrigerate it for at least 1 hour. This chilling time allows the flavors to meld beautifully and helps the cheese ball firm up for easier serving. When ready, the cheese ball should feel solid to the touch, making it perfect for spreading on crackers and fresh vegetables.
Step 5: Serve
Once chilled, unwrap the Easy Cheese Ball and place it on a serving platter. Serve it with an assortment of crackers and fresh vegetable sticks, such as celery and carrot slices. This delightful appetizer not only looks inviting but also promises a rich and creamy flavor that will be a hit at your gathering.
How to Store and Freeze Easy Cheese Ball
Fridge: Store the Easy Cheese Ball wrapped tightly in plastic wrap or in an airtight container for up to 1 week. This keeps it fresh and ready for your guests.
Freezer: For longer storage, you can freeze the cheese ball for up to 3 months. Wrap it tightly in plastic wrap, then place it in a freezer bag. Thaw in the fridge overnight before serving.
Airtight Guidance: Always ensure the cheese ball is well-wrapped to prevent freezer burn, which can affect texture.
Reheating: There’s no need to reheat the Easy Cheese Ball; serve it chilled or at room temperature for the best flavor and texture.
Make Ahead Options
These Easy Cheese Balls are perfect for meal prep enthusiasts looking to save time during busy gatherings! You can prepare the cheese ball mixture and shape it up to 24 hours in advance. Simply wrap it in plastic wrap and refrigerate; this helps the flavors blend beautifully while maintaining its creamy texture. When you’re ready to serve, roll the cheese ball in pecans just before presenting it on the platter, ensuring it retains that delightful crunch. For the best quality, store in an airtight container if made in advance; this way, you’ll have an effortlessly delicious appetizer ready to impress your guests, freeing up time for you to enjoy the festivities!
Easy Cheese Ball Variations
Feel free to let your creativity shine as you explore these fun twists for your Easy Cheese Ball, enhancing its delightful flavors and textures.
-
Herb-Infused: Add chopped dill or parsley for a fresh, herby flavor that enhances the cheese ball’s zing. These herbs will bring a vibrant touch to your appetizer.
-
Spicy Kick: Swap cheddar cheese for pepper jack to give your cheese ball a warm, spicy kick. The heat will surprise and delight your taste buds, perfect for bold flavor lovers!
-
Nutty Variations: Use almonds or pistachios instead of pecans for a unique crunch. Each nut provides its own flavor profile, adding depth every bite.
-
Smoky Flavor: Incorporate smoked paprika into the mixture for a rich smokiness that pairs wonderfully with the creaminess of the cheese. It’s a simple change that packs a big flavor punch!
-
Sweet and Savory: Add a drizzle of honey or chopped dried cranberries to the cheese mixture for a sweet contrast to the savory ingredients. This unexpected twist keeps your cheese ball light and refreshing.
-
Tropical Touch: Fold in some finely chopped pineapple for a juicy, tropical hint. The sweetness balances beautifully with the sharp cheddar and cream cheese.
-
Different Cheeses: Experiment with goat cheese or feta for a tangy flavor profile. These cheeses will create a distinct taste that’s sure to be a conversation starter at your gathering.
For more elevated appetizer ideas, consider trying my scrumptious Buffalo Chicken Cheese or delectable Mac Cheese Nostalgic recipes!
Expert Tips for the Best Easy Cheese Ball
-
Softened Cream Cheese: Always ensure your cream cheese is softened. This prevents clumps and allows for a smooth blend in your Easy Cheese Ball.
-
Flavor Boost: Don’t hesitate to experiment with different herbs like dill or spices like smoked paprika for extra flair. They can elevate the classic taste to new heights!
-
Nut Alternatives: If you’re not a fan of pecans, walnuts, almonds, or pistachios work wonderfully too! Just choose whichever gives you that perfect crunch.
-
Checking Freshness: Always inspect your cheese ball for spoilage before serving, especially if it’s been stored for more than a week. Safety first!
-
Chill Time: Allow for adequate chilling time—at least 1 hour—so the flavors meld beautifully and the texture firms up for perfect spreading.
What to Serve with Easy Cheese Ball?
Indulge in a gathering filled with flavors that awaken your senses, transforming the cheese ball into a centerpiece of joy.
-
Assorted Crackers: Crispy textures and subtle flavors enhance the creaminess of the cheese ball, making it easy to scoop up every delicious bite. Choose a variety for an inviting platter.
-
Fresh Vegetable Sticks: Carrot, cucumber, and bell pepper sticks bring a refreshing crunch that balances the richness of the cheese ball, adding vibrant colors to your table arrangement.
-
Savory Pretzel Crisps: These add a delightful twist with their salty goodness, contrasting beautifully with the creamy cheese ball. Plus, they’re perfectly shaped for scooping!
-
Fruit Compote: A sweet and tangy side, like cranberry or fig, enhances the flavors of the cheese ball, adding a gourmet touch. Serve it in a small bowl alongside for dipping.
-
Wine Pairing: A light, crisp white wine, such as Sauvignon Blanc, complements the cheese ball’s savory elements, creating a delightful drinking experience that your guests will love.
-
Mini Quiches: For a heartier option, serve alongside mini quiches that provide a savory bite, balancing the cheese ball’s creamy texture with fluffy, eggy goodness.
Pairing these options with your Easy Cheese Ball will ensure every bite is an exploration of flavor, making your get-together unforgettable!
Easy Cheese Ball Recipe FAQs
What type of cream cheese should I use?
Absolutely! I recommend using full-fat cream cheese for the richest flavor and creamiest texture. Make sure it’s softened to room temperature before mixing, as this will help avoid lumps and ensure a smooth consistency in your Easy Cheese Ball.
How long can I store the Easy Cheese Ball in the fridge?
You can keep the Easy Cheese Ball stored in the fridge for up to 1 week. Just wrap it tightly in plastic wrap or place it in an airtight container to maintain its freshness and flavor. Remember to keep an eye on it and check for any spoilage signs, such as an off smell or dark spots.
Can I freeze the Easy Cheese Ball?
Certainly! To freeze your Easy Cheese Ball, wrap it tightly in plastic wrap, then place it in a freezer bag. This way, you can enjoy it for up to 3 months. When you’re ready to serve, just thaw it overnight in the refrigerator—easy and convenient!
What if my cheese ball is too soft or sticky?
If you find your Easy Cheese Ball too soft or sticky, it could be due to not chilling it long enough. Try wrapping it and refrigerating for an additional hour or so. If it’s still not holding its shape, you can add a bit more shredded cheese to help firm it up—mix it gently until incorporated.
Are there any allergy considerations for the ingredients?
Yes! For those with nut allergies, I recommend skipping the pecan coating or replacing it with seeds like sunflower seeds, which add crunch without the allergy risk. Always double-check for any other allergies related to dairy or specific spices, and feel free to adjust the recipe to suit your guests’ dietary needs.
Can I make the Easy Cheese Ball ahead of time?
Absolutely! This is one of the best features of the Easy Cheese Ball. You can prepare it up to a week in advance. Just store it wrapped tightly in plastic wrap in the fridge until the day you’re ready to serve. This way, you can ensure minimal prep time and maximum enjoyment with your guests!
Deliciously Easy Cheese Ball to Wow Your Guests
Ingredients
Equipment
Method
- In a stand mixer, blend 8 ounces of softened cream cheese, 2 cups of shredded sharp cheddar, and ¼ cup of finely chopped green onions. Add 1 teaspoon of Worcestershire sauce, 1 teaspoon of lemon juice, and a pinch of salt. Mix on medium speed for 3-4 minutes until the mixture is smooth and creamy.
- Once mixed, use your hands to scrape the cheese mixture from the bowl and form it into a ball shape.
- Prepare a plate with 1 cup of finely chopped pecans. Carefully roll the formed cheese ball in the pecans, ensuring it gets completely coated on all sides.
- Wrap the coated cheese ball tightly in plastic wrap and refrigerate it for at least 1 hour.
- Once chilled, unwrap the Easy Cheese Ball and place it on a serving platter with assorted crackers and fresh vegetable sticks.
Leave a Reply