
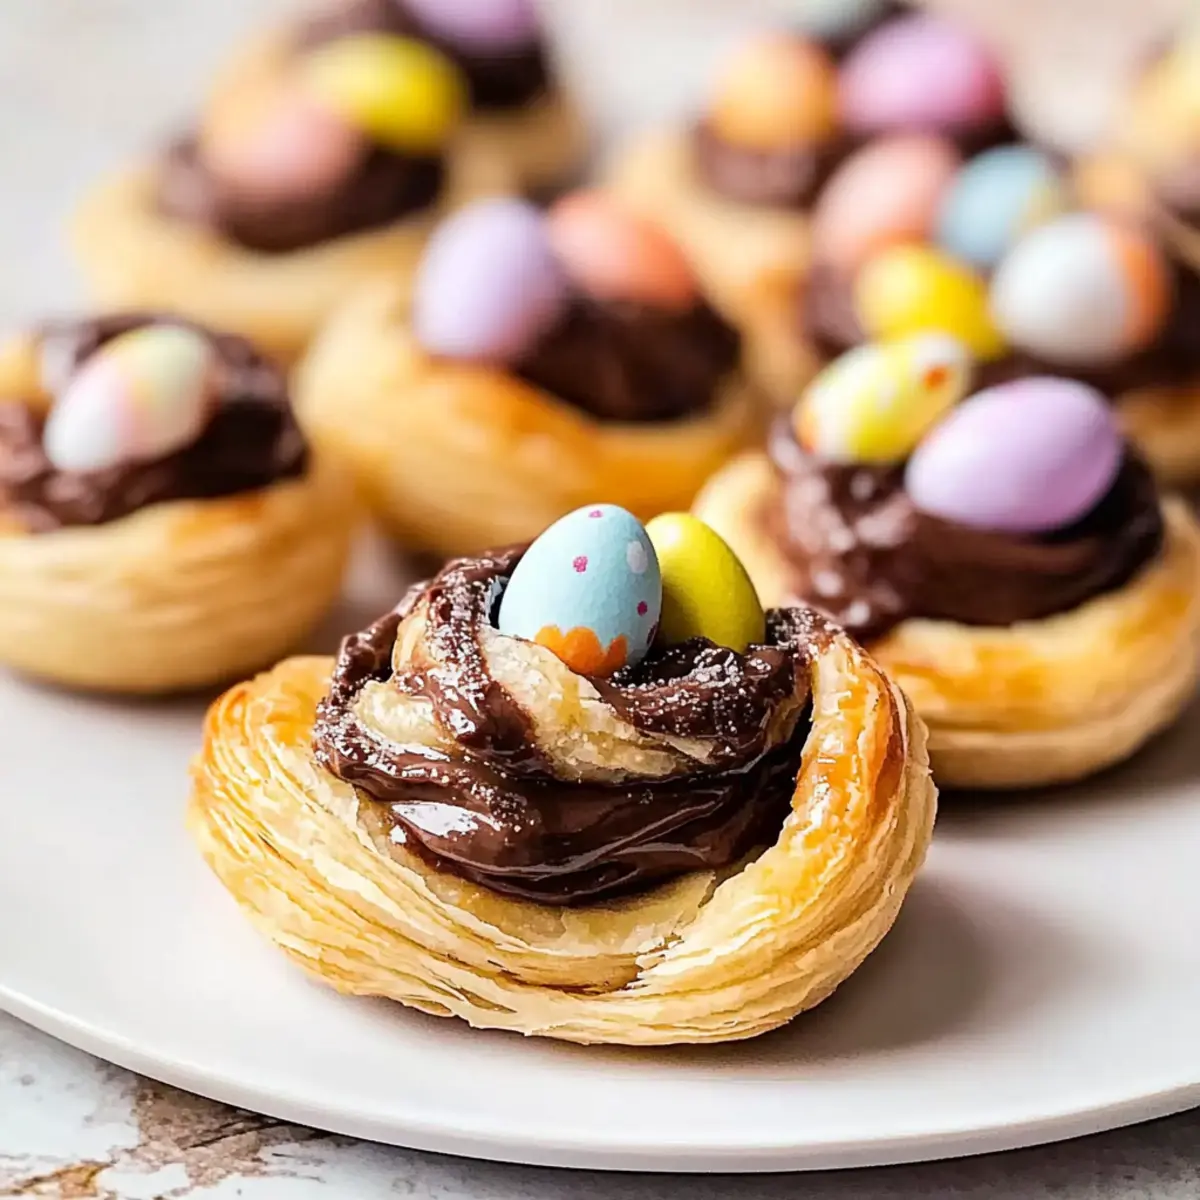
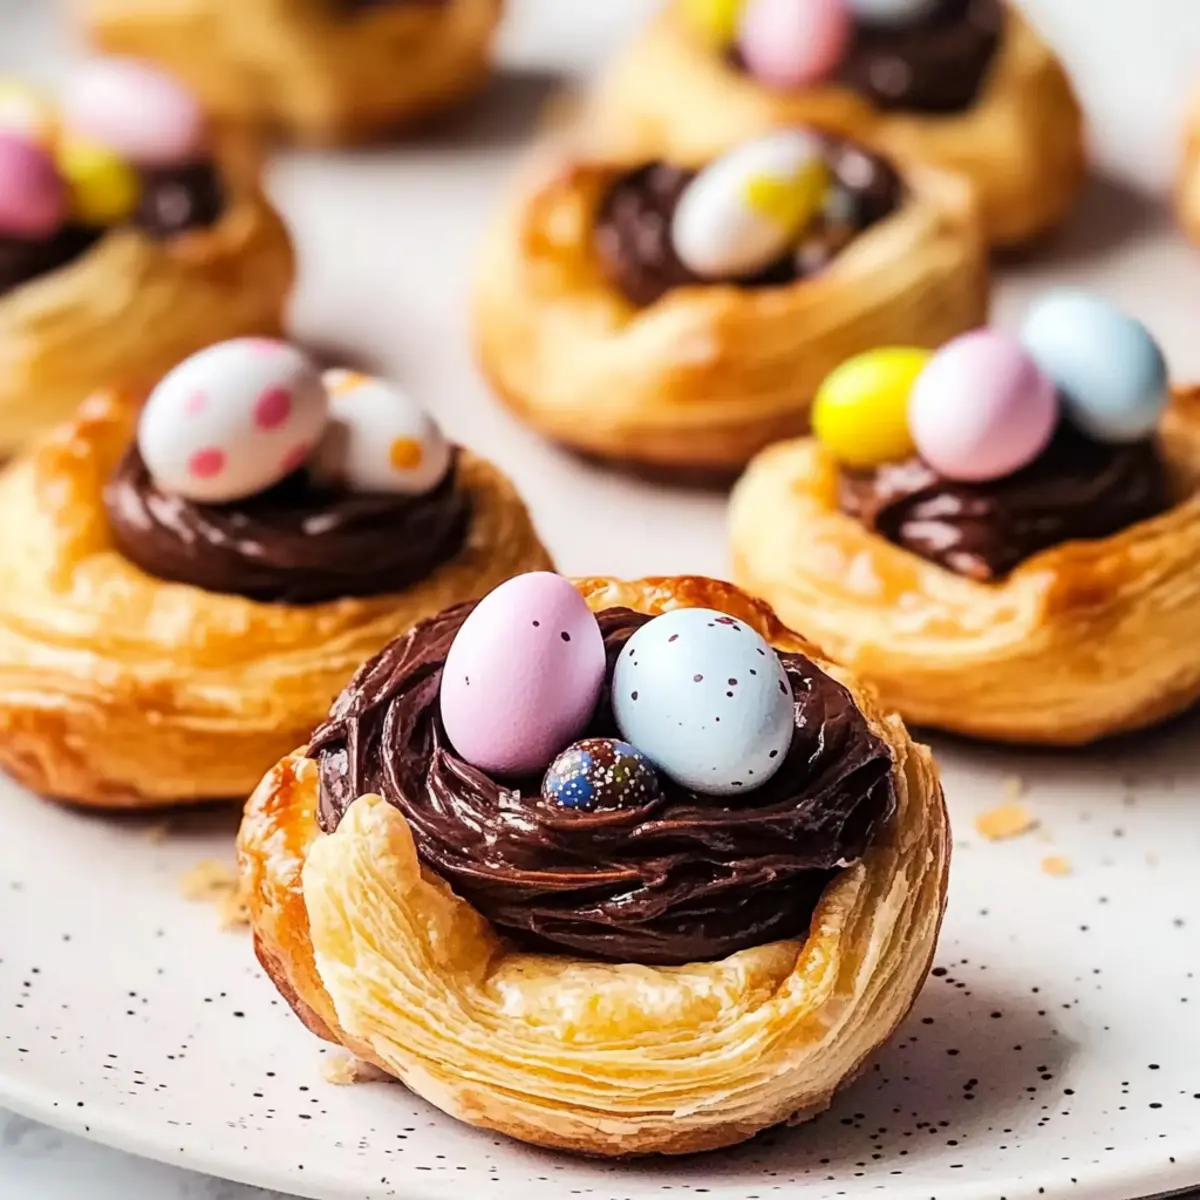
In the midst of a bustling kitchen, I overheard my kids giggling, eager to whip up something special for Easter. Their excitement inspired me to create these Nutella Puff Pastry Easter Nests—adorable little treats that are as fun to make as they are to eat. Crafted from flaky pastry, filled with rich Nutella, and adorned with colorful mini eggs, this easy baking project comes together in just under 30 minutes. Not only do these nests delight the taste buds, but they also make for a festive centerpiece at holiday gatherings, sure to capture the attention of little hands and big smiles alike. Are you ready to join in the fun and whip up these charming treats?

Why are Puff Pastry Easter Nests delightful?
Quick Preparation: This recipe is a breeze, allowing you to create festive treats in just under 30 minutes. Perfect for busy kitchens!
Kid-Friendly Fun: Involve the little ones in crafting these adorable nests, boosting their creativity and culinary skills.
Rich Flavor: The combination of flaky pastry with creamy Nutella provides a rich, indulgent experience that everyone will love.
Versatile Toppings: Get creative by swapping mini eggs for an array of candies—perfect for any festive occasion!
Impressive Presentation: Imagine the smiles when you serve these golden nests at your Easter gathering, making them a highlight of the feast!
Puff Pastry Easter Nests Ingredients
For the Nests
• Ready-rolled puff pastry – Use store-bought to save time and ensure perfect flakiness.
• Nutella – The star filling, providing a rich chocolate-hazelnut flavor; feel free to substitute with any chocolate spread, hazelnut spread, or even your favorite jam.
• Mini eggs – These delightful toppings add a pop of color and sweetness; small chocolate eggs like Smarties or chocolate buttons also work beautifully!
For the Finish
• Milk (optional) – Brushing with milk before baking enhances the nests’ golden color; an egg wash can be used for a richer finish.
• Demerara sugar (optional) – A sprinkle on top creates added crunch and shine, elevating both texture and appearance.
With these key ingredients, your Puff Pastry Easter Nests will be both easy to make and utterly delightful to eat!
Step‑by‑Step Instructions for Puff Pastry Easter Nests
Step 1: Preheat the Oven
Begin by preheating your oven to 180°C (350°F). While the oven warms up, line a baking tray with parchment paper to prevent the pastries from sticking. This preparation step ensures that your Puff Pastry Easter Nests come out golden and crisp, ready for the delightful filling of Nutella.
Step 2: Soften the Nutella
Take 150g of Nutella and place it in a microwave-safe bowl. Heat it in the microwave for about 10-15 seconds until it’s slightly warm and easily spreadable. This softening allows you to work with the Nutella more effortlessly when you spread it over the puff pastry, enhancing the flavor in every bite of your nests.
Step 3: Prepare the Puff Pastry
Unroll the ready-rolled puff pastry on a lightly floured surface. Spread the warmed Nutella over half of the pastry sheet, leaving the other half free for folding. Fold the pastry over the Nutella-covered side and press the edges gently to seal. This ensures a deliciously rich filling stays inside while baking.
Step 4: Cut the Pastry Strips
Using a sharp knife or pizza cutter, slice the folded puff pastry into 12 strips, each approximately 1.5 cm wide. The size of these strips is crucial as they will form the nests when twisted. Ensure you cut through the pastry evenly for uniform baking, contributing to the delightful look of your Puff Pastry Easter Nests.
Step 5: Twist and Shape the Strips
Take each pastry strip and give it a gentle twist, then shape it into a nest on the prepared baking tray. Arrange them with a little space between each nest, as they will puff up while baking. This step creates the charming nest shape that will cradle your colorful mini eggs beautifully.
Step 6: Brush and Sprinkle
Optionally, brush the tops of the formed nests with a little milk for a golden finish. If you’d like an extra crunch, sprinkle some demerara sugar on top before popping them in the oven. This not only adds sweetness but gives your Puff Pastry Easter Nests a lovely finishing touch.
Step 7: Bake to Perfection
Place the baking tray in the preheated oven and bake for 12-14 minutes. Keep an eye on them as they bake; they should turn a beautiful golden brown when done. This is the moment your kitchen will fill with the enticing aroma of baked pastry, signaling that tasty treats are on their way!
Step 8: Cool and Decorate
Once baked, remove the nests from the oven and allow them to cool completely on a wire rack. This crucial cooling phase prevents the Nutella from melting further when you top the nests. After cooling, feel free to drizzle a little more Nutella on top and decorate with colorful mini eggs for an adorable finish.
Storage Tips for Puff Pastry Easter Nests
Room Temperature: Store baked nests in an airtight container at room temperature for up to 1 day to maintain their crispness and flavor.
Refrigerator: If storing longer, keep the nests in the fridge for up to 3 days. They may lose some flakiness and should be reheated before serving.
Freezer: Freeze baked nests in a single layer, wrapped tightly in plastic wrap and then in foil, for up to 1 month. Thaw before reheating to enjoy at their best.
Reheating: To regain their crisp texture, reheat the nests in a preheated oven at 180°C (350°F) for 5-7 minutes before serving, perfect for enjoying your Puff Pastry Easter Nests all over again!
Make Ahead Options
These Puff Pastry Easter Nests are perfect for busy home cooks looking to save time! You can prepare the nests up to 24 hours in advance by shaping them and placing them on the baking tray. Cover them tightly with plastic wrap and refrigerate to keep the pastry fresh and flaky. When you’re ready to bake, simply preheat the oven and brush the nests with milk, then sprinkle with sugar if using. Bake as directed, and enjoy the delicious transformation! They’ll be just as golden and delightful, making your Easter planning effortless while keeping the fun intact for your little helpers.
Expert Tips for Puff Pastry Easter Nests
- Choose Quality Pastry: Use high-quality ready-rolled puff pastry for the best texture. Store-bought ensures consistent results that are golden and flaky.
- Warm Your Nutella: To meet the perfect spreading consistency, warm your Nutella slightly. This prevents tearing of the pastry and allows for easy application.
- Cut Even Strips: Make sure to cut the pastry into even strips for uniform baking. This helps each nest to puff up beautifully without uneven cooking.
- Spacing Matters: Leave enough space between the nests on the baking tray to avoid them sticking together during baking, ensuring each one bakes properly.
- Cool Before Topping: Let the nests cool completely before adding your toppings to prevent the Nutella from melting too much and maintain that charming presentation.
What to Serve With Puff Pastry Easter Nests?
Bring your Easter gatherings to life with delightful accompaniments that complement these charming treats and make your meal memorable.
-
Fresh Fruit Salad: A vibrant mix of seasonal fruits adds a refreshing balance to the rich nutty flavors of the nests, lightening the overall meal.
-
Chocolate Dipped Strawberries: These indulgent desserts are a playful nod to the nuts and chocolate in your nests, creating a lovely harmony between flavors.
-
Mini Quiches: Savory mini quiches provide a delicious counterpoint to your sweet nests, offering a savory bite to round out the meal beautifully.
-
Vanilla Ice Cream: A scoop of creamy vanilla ice cream served alongside the warm nests enhances the chocohazelnut filling while adding a luscious texture that melts in your mouth.
-
Elderflower Lemonade: Refreshing and lightly floral, this drink pairs perfectly with the sweetness of the nests, keeping everyone refreshed throughout the celebration.
-
Carrot Cake: Bring a classic Easter dessert into the mix! The spices and cream cheese frosting of a homemade carrot cake will beautifully echo the springtime theme.
-
Chocolate Milkshake: For those who adore sweet treats, a chocolate milkshake will resonate perfectly with the Nutella flavor, making it a hit among kids and adults alike!
Puff Pastry Easter Nests: Customize Your Treats
Get creative with these delightful nests by trying out your own unique twists and swaps to suit your taste!
- Nut-Free: Replace Nutella with sunflower seed butter or tahini for a nut-free filling that everyone can enjoy. This swap brings a unique flavor while staying allergy-friendly.
- Fruit-Filled: Instead of Nutella, fill the nests with sweetened cream cheese and fresh berries for a fruity twist. The vibrant colors and fresh taste will add a refreshing touch to your Easter treats!
- Chocolate Lovers: Use dark chocolate ganache instead of Nutella for a deeper chocolate flavor. Rich and velvety, this option is perfect for choco-holics craving an indulgent dessert.
- Dairy-Free: Substitute the milk wash with almond milk or coconut milk to keep the nests dairy-free while still achieving that lovely golden finish. These replacements cater to diverse dietary needs without sacrificing flavor!
- Spiced Up: Add a sprinkle of cinnamon or nutmeg to your Nutella before spreading it on the pastry for a cozy, spiced flavor that complements the chocolate wonderfully. A touch of warmth makes these nests feel even more festive!
- Savory Option: Skip the Nutella and opt for a filling of pesto and cheese for a savory take on these nests. Top with sun-dried tomatoes for added flavor and a delightful contrast to the pastry.
- Decadent Drizzle: After baking, drizzle melted white chocolate over the nests for a touch of sweetness and extra elegance. This simple addition elevates the look and flavor!
- Heat It Up: Add a pinch of cayenne pepper or chili powder to the Nutella for a spicy kick that brings a fun twist to the sweet treat. This unexpected flavor combination makes for an exciting surprise!
Feel free to explore these variations, and don’t hesitate to experiment! You can also check out easy baking recipes for more delightful ideas or learn how to enhance your treats with creative toppings. Happy baking!

Puff Pastry Easter Nests Recipe FAQs
What type of puff pastry should I use?
I recommend using high-quality, ready-rolled puff pastry for ease and consistency. Store-bought options work great to create perfectly flaky nests without the hassle of homemade dough. However, if you’re feeling adventurous, you can absolutely make your own for an extra touch of personal flavor!
How do I store leftover Puff Pastry Easter Nests?
You can keep the baked nests in an airtight container at room temperature for up to 1 day to retain their crispness. If you’d like to store them longer, refrigerate for up to 3 days, though they may lose a bit of flakiness. For longer storage, freeze them for up to a month wrapped tightly in plastic and foil. Just be sure to reheat in a preheated oven at 180°C (350°F) for about 5-7 minutes to regain their delightful crispness.
Can I freeze Puff Pastry Easter Nests?
Absolutely! To freeze, place the baked nests in a single layer on a parchment-lined tray and freeze until solid. Then, wrap each nest tightly in plastic wrap and then in aluminum foil. They’ll stay fresh for up to 1 month. Simply thaw in the fridge overnight before reheating in the oven to enjoy.
What can I do if my pastry is tearing while I spread the Nutella?
If you find your pastry tearing, it could be because the Nutella isn’t spreadable enough. Warm it for 10-15 seconds in the microwave until it’s soft and easy to spread. Additionally, be gentle while spreading to avoid damaging the pastry. If all else fails, roll out a new sheet of pastry quickly to stay in the flow of your delightful kitchen experience!
Are there any allergy concerns with this recipe?
Yes, this recipe contains gluten and dairy from the puff pastry, and Nutella contains hazelnuts. If you have gluten sensitivity, consider looking for gluten-free puff pastry options. Nut butter or fruit spreads can be good replacements for Nutella for those with nut allergies. Always check ingredient labels for any allergen warnings!
Can I add different fillings to the nests?
Very! Feel free to get creative by swapping Nutella for other spreads like chocolate, hazelnut, or fruit jams. You can even add mini chocolate chips or dried fruit for a different texture and flavor profile. The more, the merrier—let your imagination run wild with fillings that excite you and your family!
Puff Pastry Easter Nests: Easy Nutella Treats for Kids
Ingredients
Equipment
Method
- Preheat your oven to 180°C (350°F) and line a baking tray with parchment paper.
- Place 150g of Nutella in a microwave-safe bowl and heat for 10-15 seconds until slightly warm.
- Unroll the ready-rolled puff pastry on a lightly floured surface. Spread the warmed Nutella over half of the pastry sheet.
- Fold the pastry over the Nutella-covered side and press the edges to seal.
- Slice the folded pastry into 12 strips, each about 1.5 cm wide.
- Twist each strip and shape it into a nest on the baking tray, leaving some space between them.
- Brush the tops with milk and sprinkle with demerara sugar if desired before baking.
- Bake for 12-14 minutes until golden brown. Keep an eye on them as they bake.
- Allow the nests to cool completely on a wire rack before decorating with additional Nutella and mini eggs.
Leave a Reply