
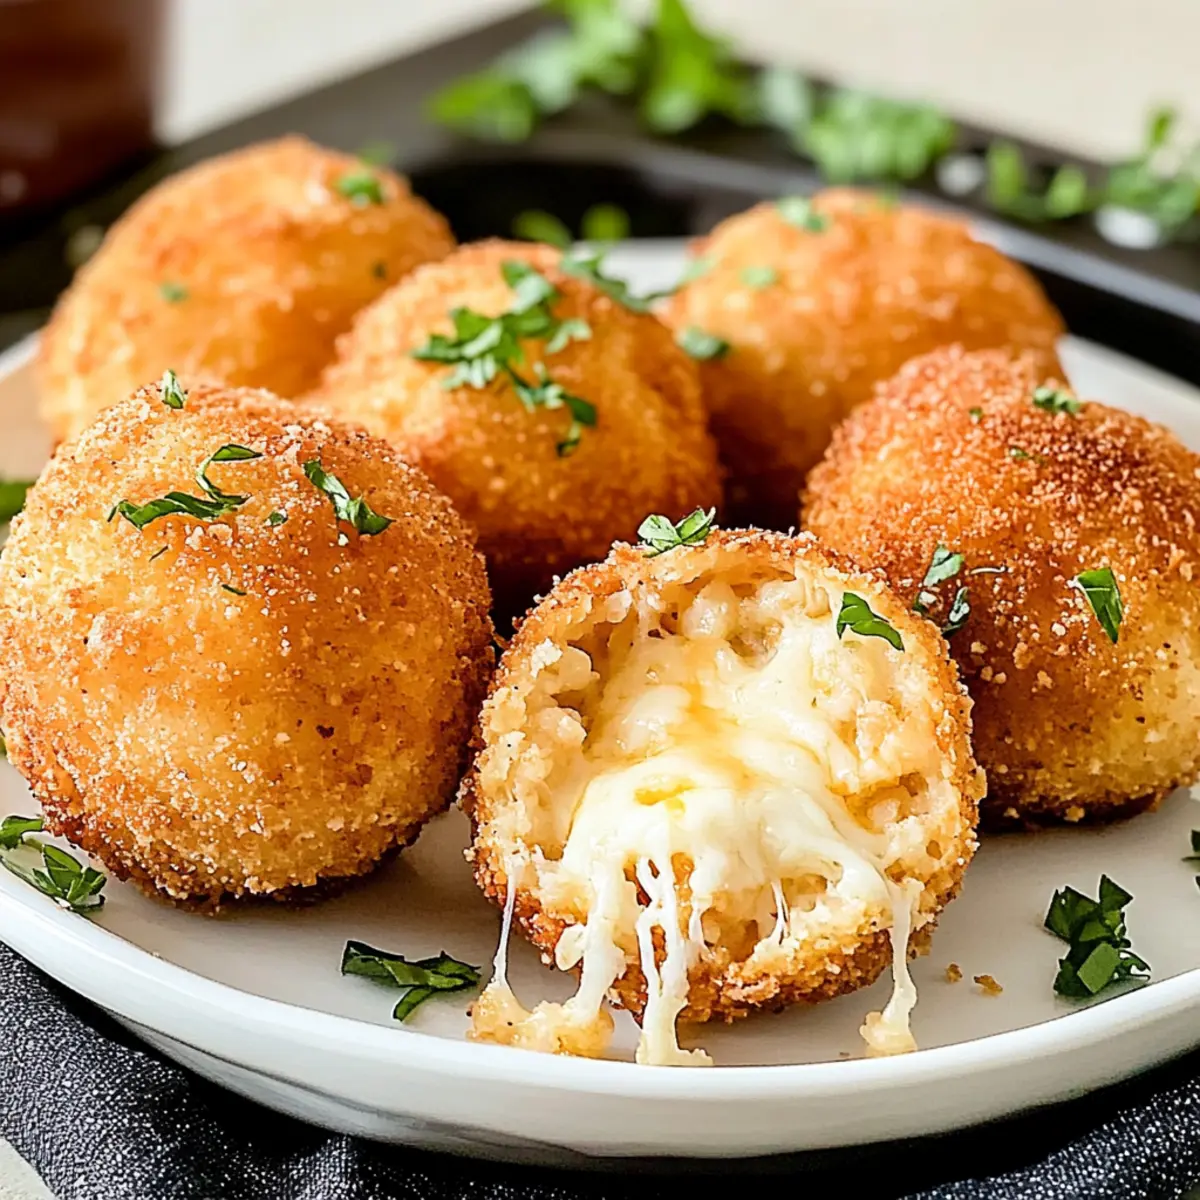
The tantalizing aroma of garlic and melted cheese is wafting through my kitchen as I prepare a delicious twist on a classic favorite: Baked Cauliflower Arancini. This healthier version substitutes traditional rice with nutrient-packed cauliflower rice, producing a snack that’s not only low-carb and gluten-free but also exceptionally quick to whip up—ready in under an hour! These golden bites are perfect for any occasion, whether you’re hosting a gathering or simply craving a cozy evening snack. Each crunchy sphere offers a delightful surprise of melted mozzarella within—a satisfying indulgence without the guilt. Curious about how to elevate your next appetizer? Let’s dive into this scrumptious recipe together!

Why Try Cauliflower Arancini?
Healthy Twist: The use of cauliflower rice makes this recipe lower in carbs and gluten-free, perfect for dietary needs while still satisfying your cravings.
Quick Preparation: These bites are ready in under an hour, making them an ideal choice for last-minute gatherings or a cozy night in.
Bursting with Flavor: Each crunchy exterior hides a gooey, melted mozzarella center that elevates the taste to new heights!
Versatile Serving Options: Serve these delightful bites as appetizers, snacks, or even alongside a simple salad for a complete meal. If you’re looking for more delicious ideas, check out our Spicy Baked Cauliflower for a flavorful side!
Crowd-Pleasing Appeal: They’re sure to impress guests at any gathering, giving a nostalgic nod to traditional arancini while maintaining a healthier profile.
Cauliflower Arancini Ingredients
For the Cauliflower Mix
• Garlic Clove – Adds aromatic flavor; for a milder taste, use garlic powder instead.
• Olive Oil – Used for sautéing; provides healthy fats; can substitute with avocado oil.
• Chicken Stock (No Salt Added) – Provides moisture and flavor; replace with vegetable broth for a vegetarian option.
• Raw Cauliflower Rice – Main ingredient; provides bulk and texture; available pre-riced, fresh, or frozen.
• Shredded Parmesan Cheese – Contributes creaminess and flavor; substitute with nutritional yeast for a dairy-free option.
• Shredded Mozzarella Cheese – Adds melting quality and cheese flavor; for non-dairy, try coconut-based cheese.
• Fresh Mozzarella Cubes – Delivers gooey texture; can replace with a soft cheese like goat cheese if desired.
• Eggs – Binds the ingredients together; for a vegan substitute, use flax eggs or silken tofu.
For Coating
• Plain Bread Crumbs – Coating for crunch; use gluten-free breadcrumbs to keep it gluten-free.
• Cooking Oil Spray – Helps achieve a crispy texture while baking; olive oil can be brushed on as an alternative.
For Garnishing
• Freshly Grated Parmesan (for garnish) – Additional flavor and garnish; optional for those avoiding dairy.
• Finely Chopped Parsley (for garnish) – Offers freshness and color; optional.
• Marinara Sauce (for dipping) – Complementary sauce; can use store-bought or homemade.
Step‑by‑Step Instructions for Cauliflower Arancini
Step 1: Preheat and Prepare the Baking Sheet
Start by preheating your oven to 400°F (200°C). While the oven warms up, line a baking sheet with parchment paper to prevent sticking and make cleanup a breeze. This allows the heat to circulate evenly around your Cauliflower Arancini, giving them a perfectly crispy exterior.
Step 2: Sauté Garlic and Cauliflower
In a skillet over medium-high heat, pour in a splash of olive oil and add a minced garlic clove. Sauté for about 2 minutes until the garlic becomes fragrant and lightly browned. Then, incorporate the raw cauliflower rice into the skillet. Cook for an additional 5–7 minutes, stirring occasionally, until the cauliflower is tender. If needed, add a splash of chicken stock to keep the mixture moist.
Step 3: Combine Cheeses
Once the cauliflower is tender, remove the skillet from heat. Stir in shredded parmesan and mozzarella cheese, mixing thoroughly until the cheeses melt and create a creamy texture, about 2–3 minutes. This cheesy blend is the heart of your Cauliflower Arancini, enhancing both flavor and moistness.
Step 4: Cool and Add Egg
Allow the cauliflower mixture to cool for a few minutes until it’s manageable to touch. Once cooled, beat one egg in a small bowl and then mix it into the cauliflower blend. This crucial step binds all the ingredients, ensuring your Cauliflower Arancini hold their shape while baking.
Step 5: Shape the Arancini
Take a scoop of the cauliflower mixture and roll it into a ball, about the size of a golf ball. Press a small mozzarella cube into the center to create a delightful cheesy surprise. To make shaping easier, you can use plastic wrap to help mold the balls evenly, making sure they are compact.
Step 6: Coat the Balls
Next, dip each formed ball into a bowl of beaten egg to coat thoroughly. After the egg, roll the balls in plain breadcrumbs until well covered. This will give your Cauliflower Arancini that irresistible crispy coating once baked. Be sure to handle them gently to maintain their shape.
Step 7: Bake the Arancini
Place the coated Cauliflower Arancini on the prepared baking sheet, leaving space between each one. Lightly spray them with cooking oil to promote a golden brown crispness. Bake in the preheated oven for 15 minutes, then increase the temperature to 425°F (220°C) for an additional 10 minutes. They should be golden and deliciously crispy when done.
Step 8: Garnish and Serve
Once baked, remove the Cauliflower Arancini from the oven and let them cool for a minute. Garnish with freshly grated parmesan and finely chopped parsley for a touch of flavor and color. Serve warm alongside a marinara sauce for dipping, and enjoy these delightful bites that are sure to impress!

Storage Tips for Cauliflower Arancini
Fridge: Store uneaten arancini in an airtight container for up to 3 days. This keeps them fresh while preventing moisture buildup.
Freezer: For longer storage, freeze the arancini in a single layer on a baking sheet, then transfer to a freezer-safe bag for up to 2 months.
Reheating: For the best texture, reheat in the oven at 375°F (190°C) for about 10–15 minutes until warmed through and crispy again.
Make-Ahead Tip: You can prepare the cauliflower mixture and shape the arancini ahead of time, just store them in the refrigerator until you’re ready to bake for a quick snack or appetizer!
Make Ahead Options
These Cauliflower Arancini are perfect for meal prep, making your busy weeknights a breeze! You can prepare the cauliflower mixture and shape the balls up to 24 hours in advance—just store them in an airtight container in the fridge to maintain their freshness. For optimal texture, refrigerate them uncovered for a short time to dry slightly before coating in breadcrumbs. When you’re ready to serve, simply follow the baking instructions: bake for 15 minutes at 400°F, then increase the temperature for that perfect golden crisp. This way, you’ll enjoy delicious, homemade Cauliflower Arancini with minimal effort, making it a delightful option for any gathering or cozy night in!
What to Serve with Baked Cauliflower Arancini
Transform your snack time into an unforgettable meal by pairing these delightful bites with complementary dishes that enhance their flavors.
-
Fresh Salad: A crisp arugula or spinach salad with lemon vinaigrette adds brightness and balances the rich cheese of the arancini.
-
Garlic Bread: The crunchy, buttery goodness of garlic bread makes a perfect match, delivering that warm and comforting Italian essence.
-
Roasted Vegetables: Try a medley of seasonal roasted vegetables; their caramelized sweetness beautifully contrasts with the creamy cauliflower bites, enhancing the meal’s texture.
-
Marinara Sauce: Serve with a side of homemade or store-bought marinara for dipping; the tangy flavor of the sauce complements the cheesy goodness in each bite.
-
Creamy Polenta: A soft polenta side provides a smooth, comforting base that pairs well with the crispy texture of the arancini, marrying flavors deliciously.
-
Herbed Quinoa: For a nutritious touch, serve herbed quinoa alongside for additional protein and a nutty flavor profile, making your meal feel hearty.
-
Chilled White Wine: Pair with a chilled glass of Pinot Grigio or Sauvignon Blanc; the crispness of the wine enhances the flavors while keeping it refreshing.
-
Pesto Sauce: A vibrant basil pesto drizzle can elevate your arancini experience, adding a fresh herbaceous note that tantalizes the palate.
Each of these suggestions will create an inviting and delicious feast, making your Cauliflower Arancini the star of the show!
Cauliflower Arancini Variations & Substitutions
Dive into some exciting twists for these Cauliflower Arancini to suit your taste buds!
-
Cheese Swap: Use feta or cheddar for a tangy flavor twist. Adjust the quantities to suit your palate.
-
Herb-Infused: Stir in fresh basil or thyme for a fragrant touch. Adding herbs elevates the entire dish, making each bite aromatic and delightful.
-
Vegan Option: Swap all cheeses and eggs with plant-based alternatives. Nut cheeses and flax eggs work beautifully in this recipe, ensuring everyone can enjoy this treat!
-
Heat It Up: Add chopped jalapeños or red pepper flakes for a spicy kick. These flavorful additions create a tantalizing contrast to the creamy mozzarella.
-
Savory Add-Ins: Incorporate diced sun-dried tomatoes or olives for savory bursts that enhance the flavor profile. They add a Mediterranean flair that pairs perfectly with marinara sauce.
-
Texture Variation: Try adding crushed nuts or seeds to the breadcrumb coating for added crunch. This simple change gives your arancini a delightful bite that complements the creamy center.
-
Loaded Arancini: Stuff the balls with a mix of sautéed spinach and cheese for a nutrient boost. This variation ensures your arancini are as hearty as they are scrumptious.
If you’re a fan of rich flavors, consider accompanying these with a side of homemade Spicy Baked Cauliflower to add depth to your meal. Let every variation inspire your creativity in the kitchen!
Expert Tips for Cauliflower Arancini
• Cook Thoroughly: Ensure the cauliflower is well-cooked to avoid excess moisture, which can lead to soggy arancini.
• Drain Excess Liquid: Squeeze out any moisture from the mixture to maintain the shape and prevent the balls from falling apart during baking.
• Uniform Size: Use a cookie scoop to create evenly-sized balls, ensuring they cook evenly and provide the perfect bite each time.
• Breadcrumb Trick: Lightly spraying breadcrumbs with oil before baking enhances crispiness while keeping your Cauliflower Arancini healthier.
• Experiment with Flavors: Don’t hesitate to add herbs or spices to the cauliflower mixture for extra flavor, especially if you’re a fan of bold tastes!
• Perfect Dipping: Serve with marinara or garlic aioli for dipping to elevate your arancini experience—it’s a delightful combination!

Cauliflower Arancini Recipe FAQs
What type of cauliflower should I use?
Absolutely! Look for fresh cauliflower that is firm and devoid of dark spots or blemishes. You can also use pre-riced cauliflower for convenience; it’s available in both fresh and frozen options. If using frozen, ensure it’s thawed and well-drained to remove excess moisture before cooking.
How do I store leftover cauliflower arancini?
Store any uneaten Cauliflower Arancini in an airtight container in the fridge for up to 3 days. For optimal results, reheat them in the oven at 375°F (190°C) for about 10-15 minutes to retain their crispy exterior and warm interior.
Can I freeze cauliflower arancini?
Yes, you can! To freeze, lay the formed arancini on a baking sheet in a single layer and freeze until solid. Then transfer them to a freezer-safe bag, where they will keep well for up to 2 months. When you’re ready to enjoy, bake them from frozen at 375°F (190°C) for 25-30 minutes, or until heated through.
What if my cauliflower mixture is too wet?
Very good question! If your mixture seems too wet, you may need to squeeze out some excess moisture. Take the cauliflower mixture and place it in a clean kitchen towel or cheesecloth, then twist to wring out any liquid. This will help maintain the structure of your arancini and ensure they bake perfectly.
Are there any dietary considerations for this recipe?
Absolutely! The Cauliflower Arancini is naturally gluten-free, especially if you use gluten-free breadcrumbs. If you need to make it dairy-free, substitute all cheeses with options like nutritional yeast for flavor. For a vegan version, swap the egg with a flax egg or silken tofu; just mix one tablespoon of flaxseed meal with three tablespoons of water and let it sit for about 5 minutes until it thickens.
Can I add other ingredients or flavors to the arancini?
The more the merrier! Feel free to incorporate your favorite ingredients. Diced sun-dried tomatoes, olives, or even cooked sausage can bring unique flavors. Experimenting with different cheeses like feta or cheddar can also create delightful twists in taste. Enjoy getting creative with your Cauliflower Arancini!
Crispy Cauliflower Arancini for Guilt-Free Indulgence
Ingredients
Equipment
Method
- Preheat your oven to 400°F (200°C) and line a baking sheet with parchment paper.
- In a skillet over medium-high heat, sauté minced garlic in olive oil for about 2 minutes, then add cauliflower rice and cook for 5–7 minutes.
- Remove from heat and stir in shredded parmesan and mozzarella cheese, mixing until melted.
- Allow to cool, then mix in one beaten egg to bind the ingredients.
- Shape the mixture into balls, pressing mozzarella cubes into the centers.
- Coat balls in beaten egg and roll in breadcrumbs to create a crust.
- Place on the baking sheet, spray with oil, and bake for 15 minutes at 400°F, then increase temperature to 425°F (220°C) for 10 more minutes.
- Garnish with parmesan and parsley and serve with marinara sauce.
Leave a Reply